Реактивность в Javascript
Что такое реактивность?
Это способность фрагмента кода автоматически обновляться или перерисовываться в ответ на изменения в данных, к которым он привязан.
Попробуем понять по проще ⏬
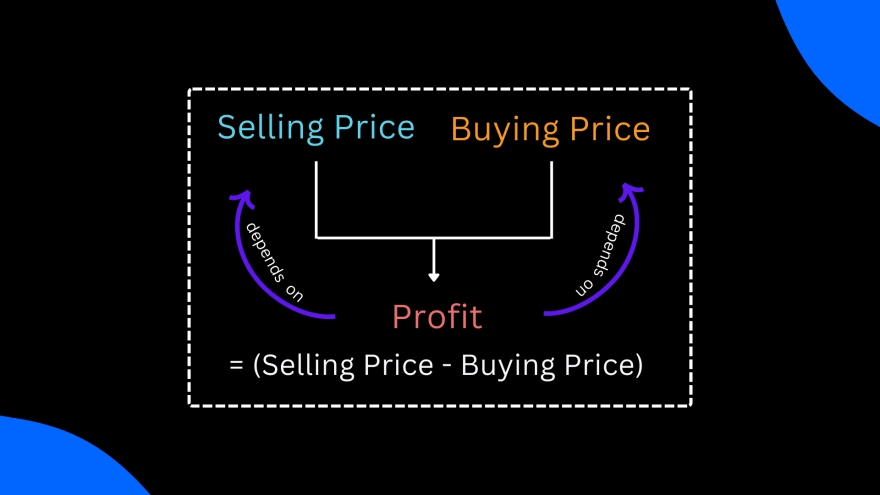
Selling Price (Цена продажи) и Buying Price (цена покупки) – это две переменные состояния, от которых зависит значение Profit (прибыли).

В случае реактивной системы
Переменная прибыли Profit будет обновляться при любых изменениях цены продажи Selling Price или цены покупки Buying Price.
В исходном состоянии цена продажи 500, а цена покупки 300, поэтому прибыль будет (500-300) = 200.
Когда мы обновляем Цену покупки до 100, Прибыль автоматически пересчитывается и обновляется до (500-100)=400.
В случае нереактивной системы
При любых изменениях Selling Price (цены продажи) или Buying Price (цены покупки) переменная прибыли не будет обновляться до тех пор, пока снова не будет вызвана функция calculateProfit().
Итак, в начальном состоянии цена продажи 500, а цена покупки 300, поэтому прибыль будет (500-300) = 200.
Когда мы обновляем цену покупки до 100, прибыль остается такой же, как и раньше. (500-300) = 200
🤔 Где используется понятие реактивности?
Концепция реактивности находится во ❤️ всех современных фронтенд фреймворках (React, Next.js, Vue.js и т. д.).
Некоторые важные части, где используется эта концепция и практика программирования:
- Хук useState React.js
- повторно визуализировать виджеты, когда какая-либо переменная ограниченного состояния была обновлена
🚀🚀 Начнем строить реактивную систему
Начните с простой нереактивной системы
let buyingPrice = 200
let sellingPrice = 500

let profit;

function calculateProfit(){
    profit = sellingPrice - buyingPrice
}

calculateProfit()
console.log("Profit : "+profit) // Profit : 300

// Update the selling price
buyingPrice = 100

// call calculateProfit() to recalculate
calculateProfit()
console.log("Profit : "+profit) // Profit : 400
Приступим к созданию реактивной системы
Шаг 1: Создайте класс зависимостей
Управляйте зависимостями, которые должны быть уведомлены, когда эти данные были обновлены или изменены.
class DependancyTracker{
    constructor(){
        this.subscribers = []
    }
    // Register the function of dependent code
    depend(){
        if(target && this.subscribers.includes(target) !== true){
            this.subscribers.push(target);
        }
    }
    // Notify the dependent codes to act on update of this data
    notify(){
        for (let i = 0; i < this.subscribers.length; i++) {
            let func = this.subscribers[i];
            func(); // run the function
        }
    }
}
Посмотрим, ee в действии
let track = new DependancyTracker();
let profit;
let buyingPrice = 200;
let sellingPrice = 400;

function calculateProfit(){
    profit = sellingPrice - buyingPrice
}

// Register the depndent code
target = calculateProfit
track.depend()
target()

// Initial profit
console.log("Profit : "+profit) // Profit : 200

// Update the selling price
sellingPrice = 500

// Notify all the dependent codes for re-compute
track.notify();
// calculateProfit is also an part of the dependent codes.

console.log("Profit : "+profit) // Profit : 300
Шаг 2. Поиграем с геттером и сеттером
Словарь для хранения начальных значений
const data = {
    "buyingPrice" : 200
}
Давайте установим геттер и сеттер для указанного ключа
let internalvalue = data.buyingPrice;

Object.defineProperty(data, "buyingPrice", {
    get: function() {
        console.log("Get trigerred");
        return internalvalue;
    },
    set: function(val) {
        internalvalue = val;
        console.log("Set trigerred")
    }
})
Посмотрим, на это в действии
data.buyingPrice=900
console.log(data.buyingPrice)
Шаг 3: Создадим функцию watch, чтобы немного упростить процесс.
function watch(func){
    target = func;
    target();
    target = null;
}
Шаг 4: Заканчиваем!!!
const data = {
    "buyingPrice" : 200,
    "sellingPrice": 400
}

let target = null;

class DependancyTracker{
    constructor(){
        this.subscribers = []
    }
    depend(){
        if(target && this.subscribers.includes(target) !== true){
            this.subscribers.push(target);
        }
    }
    notify(){
        for (let i = 0; i < this.subscribers.length; i++) {
            this.subscribers[i]();
        }
    }
}

Object.keys(data).forEach(key => {
    let internal = data[key];
    let dep = new DependancyTracker()

    Object.defineProperty(data, key, {
        get: function() {
            dep.depend(); // link target function
            return internal;
        },
        set: function(val) {
            internal = val; // set value
            dep.notify(); // notify dependent variables linked funtion
        }
    })

})

// Watch function
function watch(func){
    target = func;
    target();
    target = null;
}

// Link calculateProfit function in watch
watch(() => {
    data.profit = data.sellingPrice - data.buyingPrice
})

console.log("Profit : "+data.profit) // Profit : 200

data.sellingPrice = 700
console.log("Profit : "+data.profit) // Profit : 500

data.sellingPrice = 900
console.log("Profit : "+data.profit) // Profit : 700
Завершение🎉🎉
Надеюсь из этой статьи, вы лучше поняли концепцию реактивности.
Перевод статьи: Reactivity in Javascript
Дополнительная информация:
Понимание реактивности во Vue.js (Шаг за Шагом)